Keep Your Office Wires Hidden with an HDMI and Power Wall Plate
Electricians and contractors tasked with the structuring and setting up of computer rooms in corporate facilities tend to follow a near-universal methodology of architecting these types of professional environments. From installing HMDI and power wall plate installations to the general installation of gang plate mounting brackets, there’s a system and method to ensure quality installations.
With no guidebook in hand or higher authority advising the matter, both contractors and electricians are well aware that the end result needs to be polished, uncluttered, and undeniably professional in nature.
As such, contractors will aspire to design wide, open rooms that facilitate ease of movement, present an aura of professionalism and improves a company’s overall image.
Meanwhile, electricians will endeavor to analyze all of the various digital equipment involved in a corporation’s computer room to devise effective strategies to conceal all of the wires and cables to culminate in an orderly look while fostering plenty of ability to move around freely.
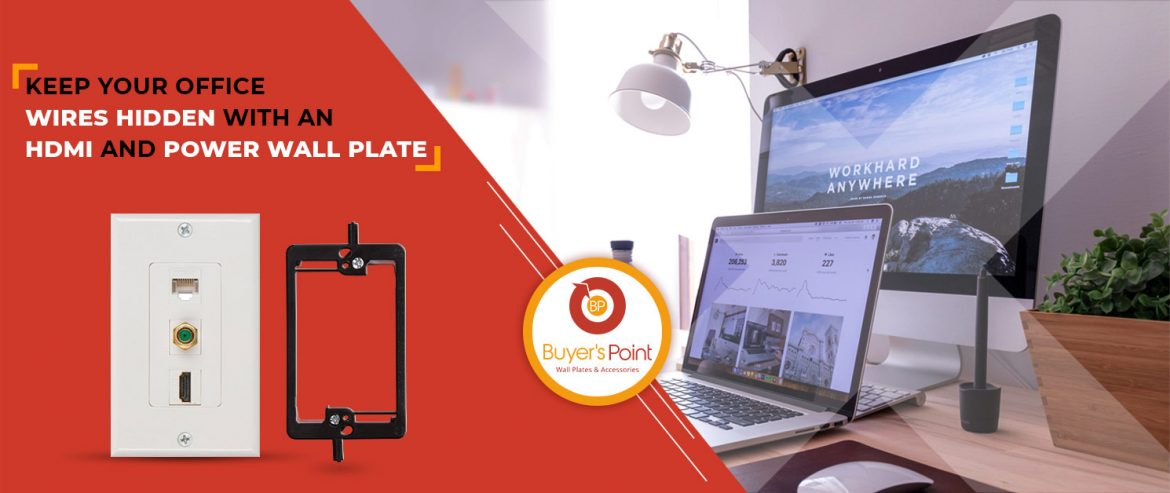
HDMI Power Wall Plates are ideal for any customer speaker installation project within many types of business, educational, and governmental environments.

These Wall Plates can also be used for residential applications, and often come with drywall anchors to assist you in an easier installation process by not having to deal with crumbling drywall.
Often coming with low voltage metal mounting brackets for a fool-proof installation into drywall material, HDMI Power Wall Plates are relatively easy to install, particularly with their gently rounded edges that prevent accidental damage to walls during installation efforts.
If you are being tasked with mounting speakers inside of walls or setting up equipment containing a multitude of wires in the computer rooms of corporations, you will absolutely want to use an HDMI Power Wall Plate to result in an expert installation showcasing flawless results that are neat, tidy, and professional in appearance.
How to Keep Your Office Wires Hidden with an HDMI and Power Wall Plate
The Preliminary Steps
1.Choose the appropriate HDMI Power Wall plate for the organization you are working for Bear in mind that you will be working with many different types of cables wires, and maybe even ports
2. Obtain the appropriate number of HDMI Power Wall Plates desired by the organization
3. Analyze the surroundings and identify which wall you will be conducting your installations on. Consider if the wires that will be embedded within the walls will encumber the use of any digital devices
4. Determine the path your collection of cables and wires will take within the wall.
The Installation Process

Tools Required For Installation
- HDMI Wall Plate install kit
- Tape measure, pencil, paper
- Masking tape
- Sheetrock saw
- Screwdriver
Installation Steps
1.Turn off all sources of electricity prior to installation to maintain your safety
2. Identify the location where the main panel of your plate will be mounted on the wall. This can be made easy by taking a tape measure, placing it at the bottom of the wall and making a mark indicating where your placement will be
3. If your HDMI Wall Plate kit came with a template, place the template right against the mark you made and hold it in place with tape
4. There should be two smaller pieces that came with your Wall Plate. Take these small pieces and lightly trace around the outside of one of the pieceswithin the right-located side of the larger template that came with your kit
5. Identify the wall location for the second piece/panel.
This piece should be placed horizontal in relation to any power outlets existing on the wall and should also match the vertical line of the first panel.
For efficacy, make sure you use a sheetrock saw to cut out eh box shapes for the smaller pieces/panels you lightly traced on the wall before
6. Neaten and uncurl any kinks in the electrical wire that accompanied your plate. After making a small-sized loop (only on one end) use it in a hook-like style to prevent it from falling through the wall’s surface.
Slowly begin to insert the wire into the wall. Continue feeding the wire into the wall while ensuring that you are holding on to the looped end you created and drop the other end of the wire gently down the hole
Keep feeding the wire into the wall until you can’t push it in any further. At this point, you will want to hook your handmade loop from the edge of the upper hole and pull about 3.5 to 4 inches outwards from the bottom hole
7. Your kit should have two electrical workboxes. Break the backing off of one of them with a knife or screwdriver and begin to feed your wire into the upper hole through the other hole you made when removing the backing.
Ensure that there are roughly six to seven inches of wire hanging out for you to work with later.
Secure the box with screws tightly. Repeat with the other box. You will then want to find the slightly inward facing cable plate featuring the power station without the requisite wire.
You will shortly install this on the upper box but only after managing to get the three colored wires out of the wall (black, white, and copper)
Take the copper wire and connect it to the grounding screw located on the rear of the cable plate. Then connect the white wire to the silver grounding-type screw located on the rear of the plate. Finally, take the black wire and connect it to the brass grounding screw on the rear of the plate. Every wire should be connected via a twisting fashion.
8. Squeeze and compress the sides of the plate. Obtain the other inwards-facing cable plate connected to the power station and while holding with one hand the wire coming out of the bottom of the device and the inwards-facing plate in the other hand.
Carefully attach the wires protruding from the wall in the following order: Green attaches to copper, black attaches to black, and white attaches to the white wire at the end of the station. After attaching them all, hold them in a bunch and secure with a wire nut.
Finally, squeeze to compress the side wings of the receptacle and push it into the wall. Fasten securely with screws in all four corners.
Provide power to the outlet by using an HDMI-approved six-foot extension cord and place the female end of the cord into the outlet located at the bottom of the cable plate while plugging the male end into the closest available power source.
Conclusion
HDMI Power Wall Plates organize the enormous amount of cables and wires attached to the many digital devices found in corporations and businesses.
Created to clean up, streamline, and conceal wires from view, HDMI Power Wall Plates are essential components that are being rapidly adopted into professional environments all over the world.
To discover the immense selection of HDMI Power Wall Platesavailable on today’s market, visitBuyer’s Point, the renowned industry leader in Wall Plates and receptacles.

The Buyer’s Point has built its reputation as an industry leader in electronic and computer accessories over the past 10 years. We specialize in delivering excellent customer service, high quality, and affordable products to design engineers, buyers and everyday consumers.
[…] post Keep Your Office Wires Hidden with an HDMI and Power Wall Plate appeared first on Buyers […]