Buyer’s Point Wall Plate Installation Guide
It’s never a bad time to upgrade your existing home theatre or audio setup. With new advancements in technology, getting a projector, 4K TV or full surround sound in your home is easier than ever. Movie lovers and music lovers around can enjoy the luxury of optimum, quality media in the comfort of their homes. But if you have a full house, the wires and setups cannot only become messy but dangerous if not managed correctly. That’s where The Buyer’s Point comes in. Our products are designed to safely hide your wires without damaging them or compromising the quality of your entertainment.
For those new to wall plate installation, we worked on a step-by-step installation guide to help new and seasoned professionals, DIYers and technicians learn new skills or polish up on their existing knowledge. We’ve also included a few Buyer’s Point tips to help you out along the way.
Step 1: The Materials
Like any project, you’ll need the right set of tools to get the job correctly. Below is a checklist of what you’ll need to get started.
- Pencil
- Level or ruler
- Cutting gloves
- Wallboard saw or equivalent
- Phillips screwdriver
- Stud finder
Buyer’s Point Tip: If you plan to cut with a powerized electric saw or a wallboard saw, be sure to wear gloves to protect your hands while cutting. There’s a lot that can go wrong when cutting drywall and wearing gloves can help minimize that risk.
If you’re adding a wall plate to an existing cut out, you can skip to Step 4.
Step 2: Measuring the wall cut out
The key to a perfect wall plate fit starts with the wall cut out. With your pencil, you’ll want to trace the inside of the mounting bracket to create a template for your wall cut out. Start tracing your cut out by following the inner lines of the mounting bracket on the left or right. There is a dip in the top of the bottom and top of the mounting bracket that you’ll have to account for. Trace the deepest edge of the top and bottom of the mounting bracket and use a ruler to finish the line to the end.

Buyer’s Point Tip: Use a stud finder to find any studs that may be behind your desired wall cut out. You’ll want to avoid cutting where a beam is as it may be difficult to feed the wires through the wall plates.
Step 3: Cutting your wall cut out
Using the wallboard saw or electric saw, follow the lines you traced in Step 2. Be sure to keep the line straights and cut all the way through the wall. If the cut isn’t straight, you’ll have a hard time fitting the wall plate in easily.
Step 4: Installing the mounting bracket
Once you have your cut out, place your mounting bracket in the wall to ensure a secure fit. Using a Phillips screwdriver, tighten the screws on the top and bottom of the mounting bracket. Be sure the small feet on the back of the wall plate are pointed up so that they are fleshed towards the wall. As you tighten the screws you will be drawing these feet in closer – securing the mounting bracket to the wall.


Step 5: Assembling the wall plate
Most of our wall plates come pre-assembled, but occasionally there are a few that are in two pieces. If you have two pieces, you’ll want to screw the inner wall plate to the outer wall plate. Using a Phillips screwdriver, screw two small screws on the inner wall plate onto the outer wall plate.

Step 6: Feed wires through wall plate
Before installing your wall plate, feed the wires or connect the wires to your wall plate.
Buyer’s Point Tip: When feeding wires through, make sure all power is turned off and there is no electricity running through the cables.
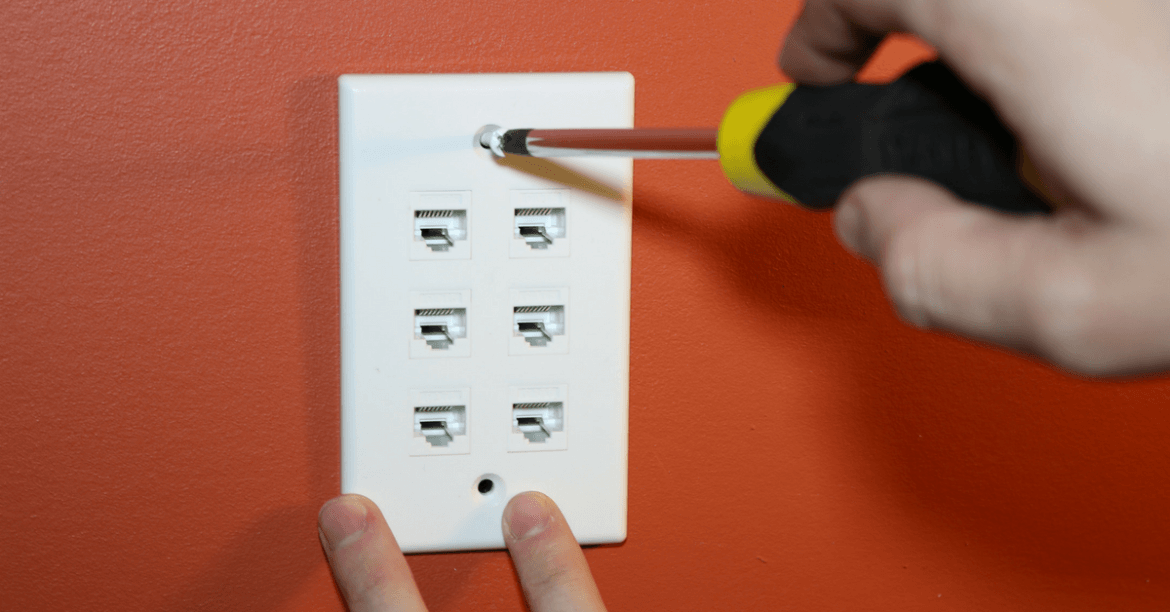
Step 7: Installing the wall plate
Locate the two big screws in your installation kit. Using a Phillips screwdriver, screw one screw at the top and bottom of wall plate. Tighten to make sure it is secured properly.

And there you have it – 7 easy steps to installing your Buyer’s Point wall plate. Our wall plates are designed to make hiding wires easy. Check out some of our other accessories to take your home theatre, audio setup, home network or RV entertainment setup to the next level.

The Buyer’s Point has built its reputation as an industry leader in electronic and computer accessories over the past 10 years. We specialize in delivering excellent customer service, high quality, and affordable products to design engineers, buyers and everyday consumers.
[…] back, we gave you a comprehensive Buyer’s Point wall plate installation guide. This is a follow up of that and in many ways, clarifies and simplifies the […]
[…] back, we gave you a comprehensive Buyer’s Point wall plate installation guide. This is a follow up of that and in many ways, clarifies and simplifies the […]